Injection Molding vs CNC vs 3D Printing - Choosing the Right Process
- Why this decision matters early
- The big picture: cost, speed, geometry
- Injection molding at a glance
- CNC machining at a glance
- 3D printing at a glance
- Clean comparison table
- Geometry the processes love (and hate)
- Materials and finishes in practice
- Accuracy and repeatability
- Setup vs unit cost: finding the break-even
- Environmental and supply-chain factors
- Real-world case examples
- How we choose at Novafab
- FAQ
Why this decision matters early
Picking the process late forces compromises: wall thickness that fights cooling, fillets that a ball end mill can’t reach, a lattice that a support strategy will ruin, or a paint spec that hates your resin. We make the process call as soon as the product intent is clear - not because we worship a machine, but because the physics become your design partner. Good choices save months.
The big picture: cost, speed, geometry
There are three axes we use first: unit cost, lead time, and geometric freedom. Molding has higher setup cost but the lowest unit cost and the most consistent cosmetics. CNC is the precision workhorse with strong materials and tight tolerances, yet it trades speed for complexity. 3D printing removes geometry chains entirely, but accuracy and surface finish depend heavily on the process you pick and your post-processing discipline.
Injection molding at a glance
Molding pays back when your design is locked and volume is real. Draft, uniform walls, and sane gate placement aren’t red tape; they’re how you get perfect parts in seconds. You spend on a tool so the machine can run without drama. If cosmetics matter - texture, gloss, perfect parting lines - molding gives you that control in the steel itself. The risk is late design changes after steel is cut; get the geometry calm before tooling.
CNC machining at a glance
CNC is brutally honest: you can hold real tolerances in real metals and high-performance plastics. Thin walls, flatness, coaxiality, orthogonality - this is where CNC shines. You pay for cycle time and setups, not a mold. If parts change weekly, that’s fine. If your geometry needs undercuts or deep internal features, you’ll plan 4th/5th axis work, custom toolpaths, or split assemblies. For small volumes with demanding precision, CNC often beats everything else for total time-to-proof.
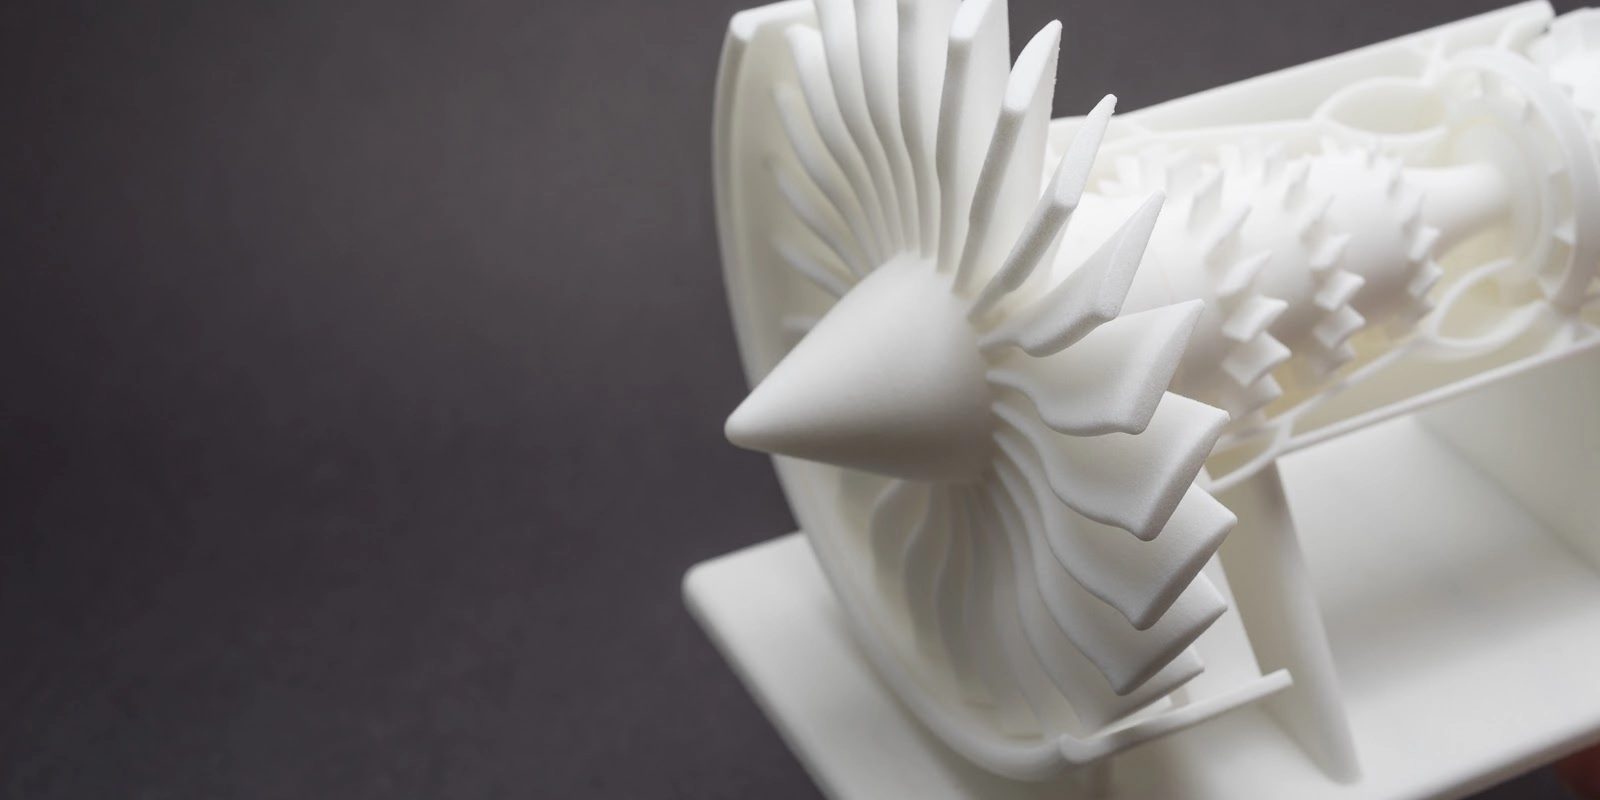
3D printing at a glance
Additive gives you shapes no cutter or parting line can handle. Lattices, conformal channels, one-piece assemblies. For prototypes and fixtures, it’s a cheat code. For production, you must be process-specific: FDM is fast and rugged but stair-steps; SLA is crisp but brittle unless you pick tough resins; SLS is the workhorse for strong nylon parts with matte finish; MJF speeds that up with better consistency; DMLS prints real metal but wants serious post-machining. Treat printing like a family of processes, not a monolith.
Clean comparison table
| Factor | Injection molding | CNC machining | 3D printing |
|---|---|---|---|
| Setup cost | High (tooling) | Low–medium (fixturing) | Low (build prep) |
| Unit cost at scale | Very low | Medium–high | Medium |
| Lead time to first parts | Longer (tool build) | Short | Very short |
| Tolerances | Good/consistent | Excellent | Process-dependent |
| Cosmetics | Tool-defined finishes | Machined finish; post required for gloss | Layer lines or powder matte; post needed |
| Best volumes | 1k+ | 1–1k | 1–500 (SLS/MJF can go higher) |
| Material breadth | Wide thermoplastics, fillers | Metals and engineering plastics | Broad but material properties vary |
Use the table to frame the decision, then validate against your geometry, finish, and timeline.
Geometry the processes love (and hate)
Molding loves uniform walls, ribs for stiffness, and draft. It hates deep blind ribs with blunt roots, random wall thickness, and cosmetic faces that double as ejector zones. CNC loves prismatic parts, tapped holes, precise pockets, bearing bores and flatness. It rolls its eyes at razor-thin fins and deep internal undercuts unless you pay for special tooling or 5-axis time. Printing loves lattices, internal channels, organic blends and single-piece assemblies - but it taxes you later if you ignore orientation, supports, or the tolerances you actually need.
Materials and finishes in practice
If the product’s life is outdoors, fuels or cleaners are in play, or a tight dielectric or biocompatible spec exists, this section decides a lot. Molding gives you ABS, PC, PP, PA, POM, blends and fillers - with defined shrink and finish libraries. CNC lets you pick 6061 vs 7075, 304 vs 316, brass, copper, POM, PEI - the properties are as real as the datasheets because you’re not melting and re-solidifying a powder. Printing can do nylon and photopolymer families all day; metals too with DMLS, but properties are anisotropic unless you heat treat and machine surfaces. Cosmetics follow the process: tool texture, machine marks, or layer lines - pick one and embrace it or plan the post-work.
Accuracy and repeatability
Here’s the honest version. Molding is consistent day-to-day once the tool is dialed, but your tolerance stack must respect shrink and cooling symmetry. CNC hits tight numbers on individual parts with careful fixturing, but repeatability across hundreds depends on tool wear and setups - solvable with good process control. Printing’s accuracy depends on the specific machine and material; dimensional drift and warp are managed with orientation, lattice infill, and post-machining critical faces. The winner for raw precision is usually CNC; the winner for consistency at volume is molding; printing wins when geometry matters more than microns.
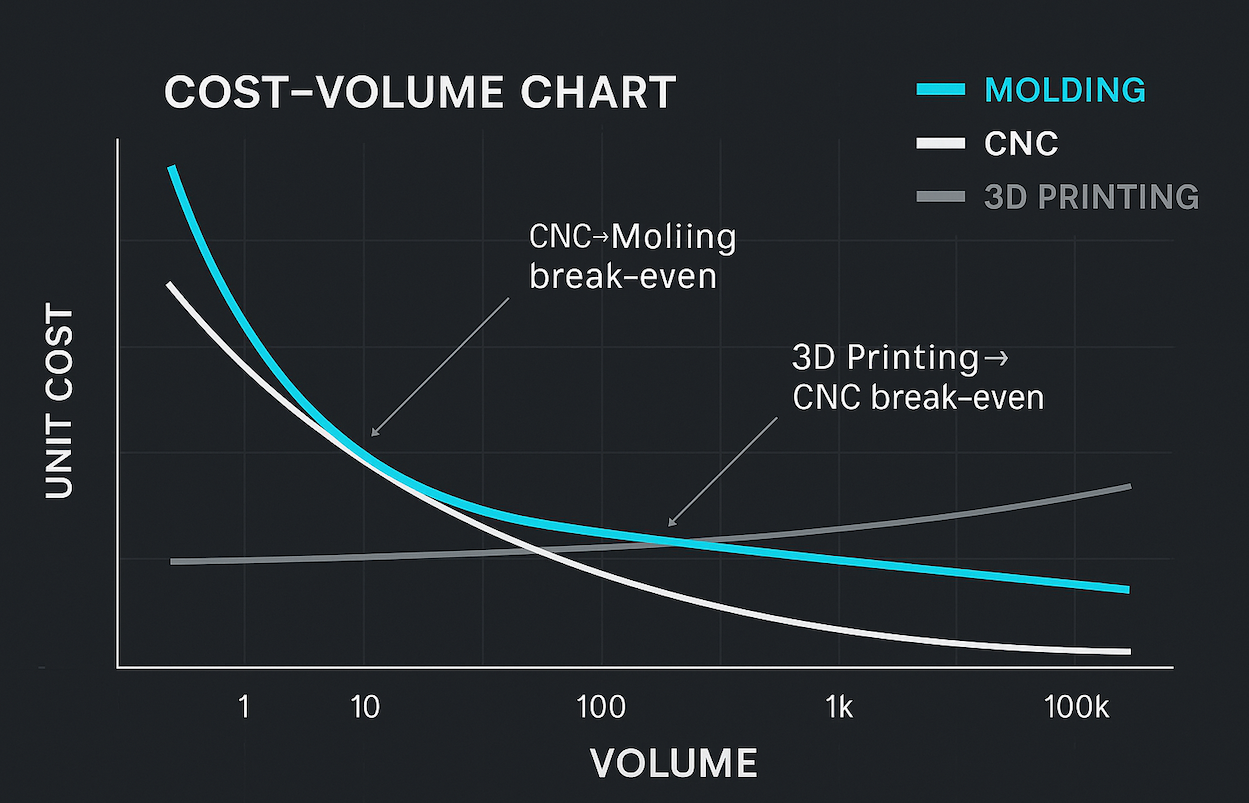
Setup vs unit cost: finding the break-even
Unit cost falls with volume in molding because the expensive part (the tool) is paid once. CNC and printing scale more linearly with time per part. We sketch a quick cost curve with your real numbers: tool quote, cycle time and resin price for molding; machining time, tools and setups for CNC; material, machine hours and post time for printing. Somewhere on that plot the lines cross. The answer isn’t generic - it’s the intersection of your design, finish and demand curve.
Environmental and supply-chain factors
For molding, cold runners can be reground where allowed; hot runners reduce waste outright. All-electric machines sip power compared to older hydraulics. CNC creates chips - recycling is straightforward; smart programming reduces air cuts and tool wear. Printing wastes little material, but support removal and post-cure can add solvents, heat and labor. If you need distributed production across sites, printing and CNC are nimble; molding is unbeatable once a region has a tool and machine time locked.
Real-world case examples
1) Wearable enclosure, cosmetic-first. We prototyped with SLA for fit and feel, then CNC’d a short batch in ABS-like sheet to validate snap fits, then molded with a fine texture in PC-ABS. The switch avoided late tool changes and gave marketing a real sample early.
2) Mechanism with tight bores. We printed jigs and nested gauges, but the product parts ran CNC in 6061 so bearing fits and flatness were non-negotiable. Printing made great fixtures; it wasn’t right for the part.
3) Lightweight duct with internal channels. Mold would have needed impossible sliders and collapsibles. SLS nylon, oriented for strength with a simple vapor polish, hit the brief in weeks. Later, we blended: CNC-machined flanges bonded to the print for gasket-quality faces.
4) Scale-up after market fit. Early runs in CNC kept cash risk low while the team refined the industrial design. After the third rev stabilized, we cut a single-cavity aluminum mold, then stepped to P20 multi-cavity once demand proved real. Total time to positive margin was shorter than gambling on a too-early tool.
How we choose at Novafab
- Intent first. Cosmetic, structural, regulatory - rank your priorities.
- Volume windows. Pilot, launch, scale - decide real quantities and dates.
- Geometry reality check. Draft, cutter reach, support strategy - pick the process that cooperates.
- Material shortlist. What survives the environment and testing - not just what’s on the shelf.
- Cost curve sketched. We draw the break-even with your numbers - not a generic one.
- Prototype tactically. Use printing for ideas, CNC for precision checks, then mold with confidence.
FAQ
What if I need metal and complex geometry. Blend processes - print the complex core, machine the critical interfaces.
Can I start with printing and later mold. Yes - just keep wall thickness and draft in mind during the print phase so the transition isn’t a redesign.
What about jigs and fixtures. Print them. They accelerate CNC and molding programs and reduce risk.
How do I pick a finish early. Decide brand intent and touch zones, then align with the process - tool texture, machining marks, or printed matte plus post.